 First, I laid out the 3/8" foam on the fuselage bottom, traced the lower
longerons from underneath, and cut the foam 0.75" oversize. I then 5
minute epoxied the foam together. I 5 min. epoxied 1x3 pine braces to the
foam to hold the shape of the fuselage bottom. Next, I cut the 3/4" foam
pieces, shaped them, and micro'ed them to the thinner foam. All that took
a whole day.
First, I laid out the 3/8" foam on the fuselage bottom, traced the lower
longerons from underneath, and cut the foam 0.75" oversize. I then 5
minute epoxied the foam together. I 5 min. epoxied 1x3 pine braces to the
foam to hold the shape of the fuselage bottom. Next, I cut the 3/4" foam
pieces, shaped them, and micro'ed them to the thinner foam. All that took
a whole day.The next day, I glassed 2 BID over the whole bottom and 1 extra BID over the fuselage floor ahead of the rear seat (Yes, I know it used to say "between the instrument panel and the seatback bulkhead", but I 'mis-spoke' [in the words of Dan Quayle]. I do NOT spell "potato" with an "e"!).
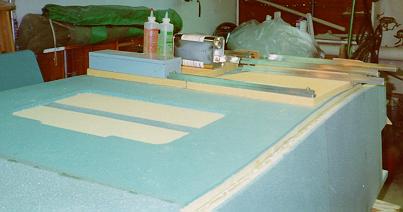
I let that tack dry, mixed up some flox, and flipped the fuselage bottom onto the fuselage sides and bulkheads (with my wife's help). I weighted the whole thing down, crawled underneath, and cleaned up all the flox joints. I leveled the fuselage fore-aft and side to side to within 0.1 degrees, and left it alone. I didn't get to the BID taping, as it was 1 AM and I had been working for 10 hours. The picture shows what the bottom looks like (after starting the Chapter 7 work):
A couple of days later I sanded and cleaned all the previous flox joints, and then taped them with 2 BID.
|
[Zeitlin's Cozy MKIV Information]
[Zeitlin's Cozy MKIV Logbook] [Cozy MKIV Information]
|